Bước 2. Lấy chứng chỉ SSLgit clone https://github.com/letsencrypt/letsencrypt /opt/letsencrypt
Nếu bạn sử dụng hệ điều hành CentOS thì làm các thao tác dưới đây để chạy Plugin Standalone, còn nếu dùng Debian/Ubuntu thì bỏ qua và thực hiện tiếp các thao tác ở bước 3.service nginx stop
Đảm bảo phiên bản Python lớn hơn hoặc bằng bản 2.7, nếu nhỏ hơn bạn cập nhật lên bằng cách sử dụng lần lượt các lệnh sau trên SSH:python –version
Bước 3. Chạy Let’s Encrypt- yum -y update
- yum groupinstall "Development tools"
- yum install zlib-devel bzip2-devel openssl-devel ncurses-devel sqlite-devel readline-devel tk-devel
- cd /opt
- wget --no-check-certificate https://www.python.org/ftp/python/2.7.6/Python-2.7.6.tar.xz
- tar xf Python-2.7.6.tar.xz
- cd Python-2.7.6
- ./configure --prefix=/usr/local
- make && sudo make altinstall
cd /opt/letsencrypt
Sau đó cài đặt các tập tin trợ giúp
Bây giờ bạn có thể sử dụng plugin Standalone bằng cách chạy lệnh:./letsencrypt-auto –help
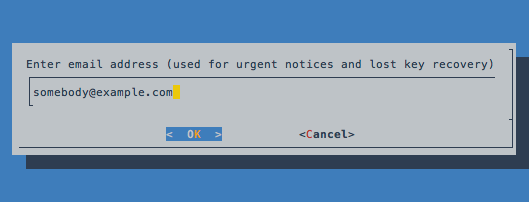
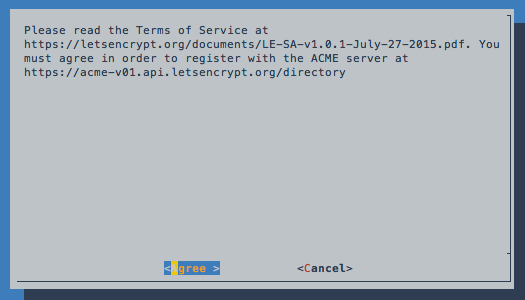
Chờ một lúc, sau khi Let’s Encrypt khởi chạy sẽ yêu cầu bạn nhập một số thông tin, bạn cần nhập đầy đủ và chính xác các thông tin này.
./letsencrypt-auto certonly --standalone


Trong thông báo trên bạn chú ý:IMPORTANT NOTES:- If you lose your account credentials, you can recover them through e-mails sent to [email protected] Congratulations! Your certificate and chain have been saved at /etc/letsencrypt/live/example.com/fullchain.pem. Your cert will expire on 2016-03-31. To obtain a new version of the certificate in the future, simply run Let's Encrypt again.- Your account credentials have been saved in your Let's Encrypt configuration directory at /etc/letsencrypt. You should make a secure backup of this folder now. This configuration directory will also contain certificates and private keys obtained by Let's Encrypt, so making regular backups of this folder is ideal.- If you like Let's Encrypt, please consider supporting our work by: Donating to ISRG / Let's Encrypt: https://letsencrypt.org/donate Donating to EFF: https://eff.org/donate-le
File SSL gồm có:
Bước 4. Cài đặt SSL lên máy chủ NGINX
Coi như việc lấy file chứng chỉ đã hoàn tất, công việc còn lại là cài đặt nó lên máy chủ. Với NGINX bạn thao tác như sau:
Bạn mở file cấu hình domain lên, hoặc tạo mới bằng lệnh sau:
nano /etc/nginx/conf.d/default
Bạn sửa lại các thông tin (được bôi đỏ) như:server {
listen 80;
server_name example.com;
location / {
return 301 https://example.com$request_uri;
}
}
server {
listen 443 ssl;
server_name example.com;
ssl_certificate /etc/letsencrypt/live/example.com/fullchain.pem;
ssl_certificate_key /etc/letsencrypt/live/example.com/privkey.pem;
ssl_protocols TLSv1 TLSv1.1 TLSv1.2;
ssl_prefer_server_ciphers on;
ssl_ciphers AES256+EECDH:AES256+EDH:!aNULL;
root /var/www/example.com/code;
index index.php index.html index.htm;
location / {
try_file $uri $uri/ /index.php;
}
location ~ \.php$ {
try_files $uri =404;
fastcgi_param SCRIPT_FILENAME $document_root$fastcgi_script_name;
include fastcgi_params;
fastcgi_pass unix:/var/run/php5-fpm.sock;
}
}
Cuối cùng khởi động lại NGINX:sudo nginx –t
Bước 5. Cài đặt SSL trên Apachesudo service nginx restart
- Cài đặt tự động:cd /opt/letsencrypt
./letsencrypt-auto --apache -d example.com -d www.example.comSau đó công cụ sẽ tự cấu hình domain cho bạn luôn, bạn vẫn cần khai báo một số thông tin như email khôi phục, và quan trọng là công cụ sẽ hỏi bạn muốn dùng cả http và https hay chỉ dùng https thôi để cấu hình redirect.
Lưu ý bạn cần thay đường dẫn /usr/share/nginx/html bằng đường dẫn chứa thư mục mã nguồn của bạn và www.example.com thành domain website của bạn.cd opt/letsencrypt
./letsencrypt-auto certonly -a webroot --agree-tos --renew-by-default --webroot-path=/usr/share/nginx/html -d example.com -d www.example.com
Bây giờ hãy mở file ra và chỉnh sửa:sudo cp /opt/letsencrypt/examples/cli.ini /usr/local/etc/le-renew-webroot.ini
Đầu tiên, xóa hoặc vô hiệu dòng server = https://acme-staging.api.letsencrypt.org/directory bằng cách thêm dấu # vào trước nó.sudo nano /usr/local/etc/le-renew-webroot.ini
Bây giờ thay vì phải nhập thông tin về email, đường dẫn đến thư mục code như câu lệnh bên trên thì sau khi ta tạo file cấu hình Let’s Encrypt, không cần nhập thông tin như thế nữa. Bây giờ để gia hạn chứng chỉ SSL bạn chỉ cần chạy các dòng lệnh sau:rsa-key-size = 4096
email = [email protected]
domains = nodejs.vn, www.nodejs.vn
webroot-path = /usr/share/nginx/html
KẾT LUẬNcd opt/letsencrypt
./letsencrypt-auto certonly -a webroot --renew-by-default --config /usr/local/etc/le-renew-webroot.ini
Tác giả: Huongnv
![[Mời thầu] Hoàn thiện phần mềm Hệ thống cơ sở dữ liệu tư liệu môi trường](/assets/news/2024_04/hoan-thien-phan-mem-he-thong-co-so-du-lieu-tu-lieu-moi-truong.png) [Mời thầu] Hoàn thiện phần mềm Hệ thống cơ sở dữ liệu tư liệu môi trường
[Mời thầu] Hoàn thiện phần mềm Hệ thống cơ sở dữ liệu tư liệu môi trường
![[Mời thầu] Gói thầu số 3: Kiểm thử phần mềm](/assets/news/2024_04/kiem-thu-phan-mem.png) [Mời thầu] Gói thầu số 3: Kiểm thử phần mềm
[Mời thầu] Gói thầu số 3: Kiểm thử phần mềm
![[Mời thầu] Bảo trì phần mềm quản trị trường học](/assets/news/2024_04/bao-tri-phan-mem-quan-tri-truong-hoc.png) [Mời thầu] Bảo trì phần mềm quản trị trường học
[Mời thầu] Bảo trì phần mềm quản trị trường học
![[Mời thầu] Thuê ngoài Dịch vụ phát triển phần mềm Hệ thống quản lý văn bản điện tử phục vụ nâng cấp SPDV](/assets/news/2024_04/thue-ngoai-dich-vu-phat-trien-phan-mem-he-thong-quan-ly-van-ban-dien-tu-phuc-vu-nang-cap-spdv.png) [Mời thầu] Thuê ngoài Dịch vụ phát triển phần mềm Hệ thống quản lý văn bản điện tử phục vụ nâng cấp SPDV
[Mời thầu] Thuê ngoài Dịch vụ phát triển phần mềm Hệ thống quản lý văn bản điện tử phục vụ nâng cấp SPDV
![[Mời thầu] Gói thầu số 01: Thuê dịch vụ phần mềm quản lý y tế cơ sở của Trung tâm y tế huyện Thạch Thất](/assets/news/2024_03/goi-thau-so-01-thue-dich-vu-phan-mem-quan-ly-y-te-co-so-cua-trung-tam-y-te-huyen-thach-that.png) [Mời thầu] Gói thầu số 01: Thuê dịch vụ phần mềm quản lý y tế cơ sở của Trung tâm y tế huyện Thạch Thất
[Mời thầu] Gói thầu số 01: Thuê dịch vụ phần mềm quản lý y tế cơ sở của Trung tâm y tế huyện Thạch Thất
 Thông báo phát hành NukeViet 4.5.05
![[Mời thầu] Gói thầu số 02: Nâng cấp phần mềm quản lý bệnh viện His của Bệnh viện đa khoa khu vực Ngọc Lặc](/assets/news/2024_03/goi-thau-so-02-nang-cap-phan-mem-quan-ly-benh-vien-his-cua-benh-vien-da-khoa-khu-vuc-ngoc-lac.png) [Mời thầu] Gói thầu số 02: Nâng cấp phần mềm quản lý bệnh viện His của Bệnh viện đa khoa khu vực Ngọc Lặc
[Mời thầu] Gói thầu số 02: Nâng cấp phần mềm quản lý bệnh viện His của Bệnh viện đa khoa khu vực Ngọc Lặc